Learn to Quilt: A Friendly Step-by-Step Guide for Beginners
So, You Want to Learn to Quilt
I’m going to guess you’re feeling a bit curious and nervous right now. You want to learn to quilt, but you don’t know where to start. You’re overwhelmed by all the tutorials, YouTube videos, and supply lists that came up in your latest Google search.
I promise, quilting is more approachable than the internet makes it look. A quilt is just three layers: a finished top, a soft batting in the middle, and a backing, held together with stitching and bound around the edges. That’s it. Everything else is a skill you can learn.
By the end of this page, you’ll know what supplies you actually need, what skills to build first, and what your first quilt could look like. Stick with me, and I’ll take you from “I could never…” to “I made that.”
I know this is possible because I used to be you. A lifetime ago, I was young, pregnant, and broke as a joke. I sewed myself maternity dresses, liked how they turned out, and did not like making them. But I loved the fabric and the machine. That was the thread.
So I turned to quilting. I bought the ugliest calico ever and a cardboard cutting mat. Actual cardboard. I cut those first squares with more enthusiasm than skill, and then I stopped. I had a stack of squares and no earthly idea what came next.
The woman who taught me to quilt took one look at those ugly fabric squares and shook her head. I’m pretty sure she considered faking an illness to avoid ever coming back. But she stayed. Her name was Susan.
I didn’t become a quilter the day I bought the fabric. I became a quilter the day someone sat beside me and showed me what came after the squares. Now it’s my turn to pull up a chair beside you.
Let’s start with the supplies you really need.
What You Really Need to Get Started
There are three piles of quilting supplies. What you need on day one, what’s nice to have, and what the internet wants you to buy that you don’t need. Let’s sort them out.
The Essentials
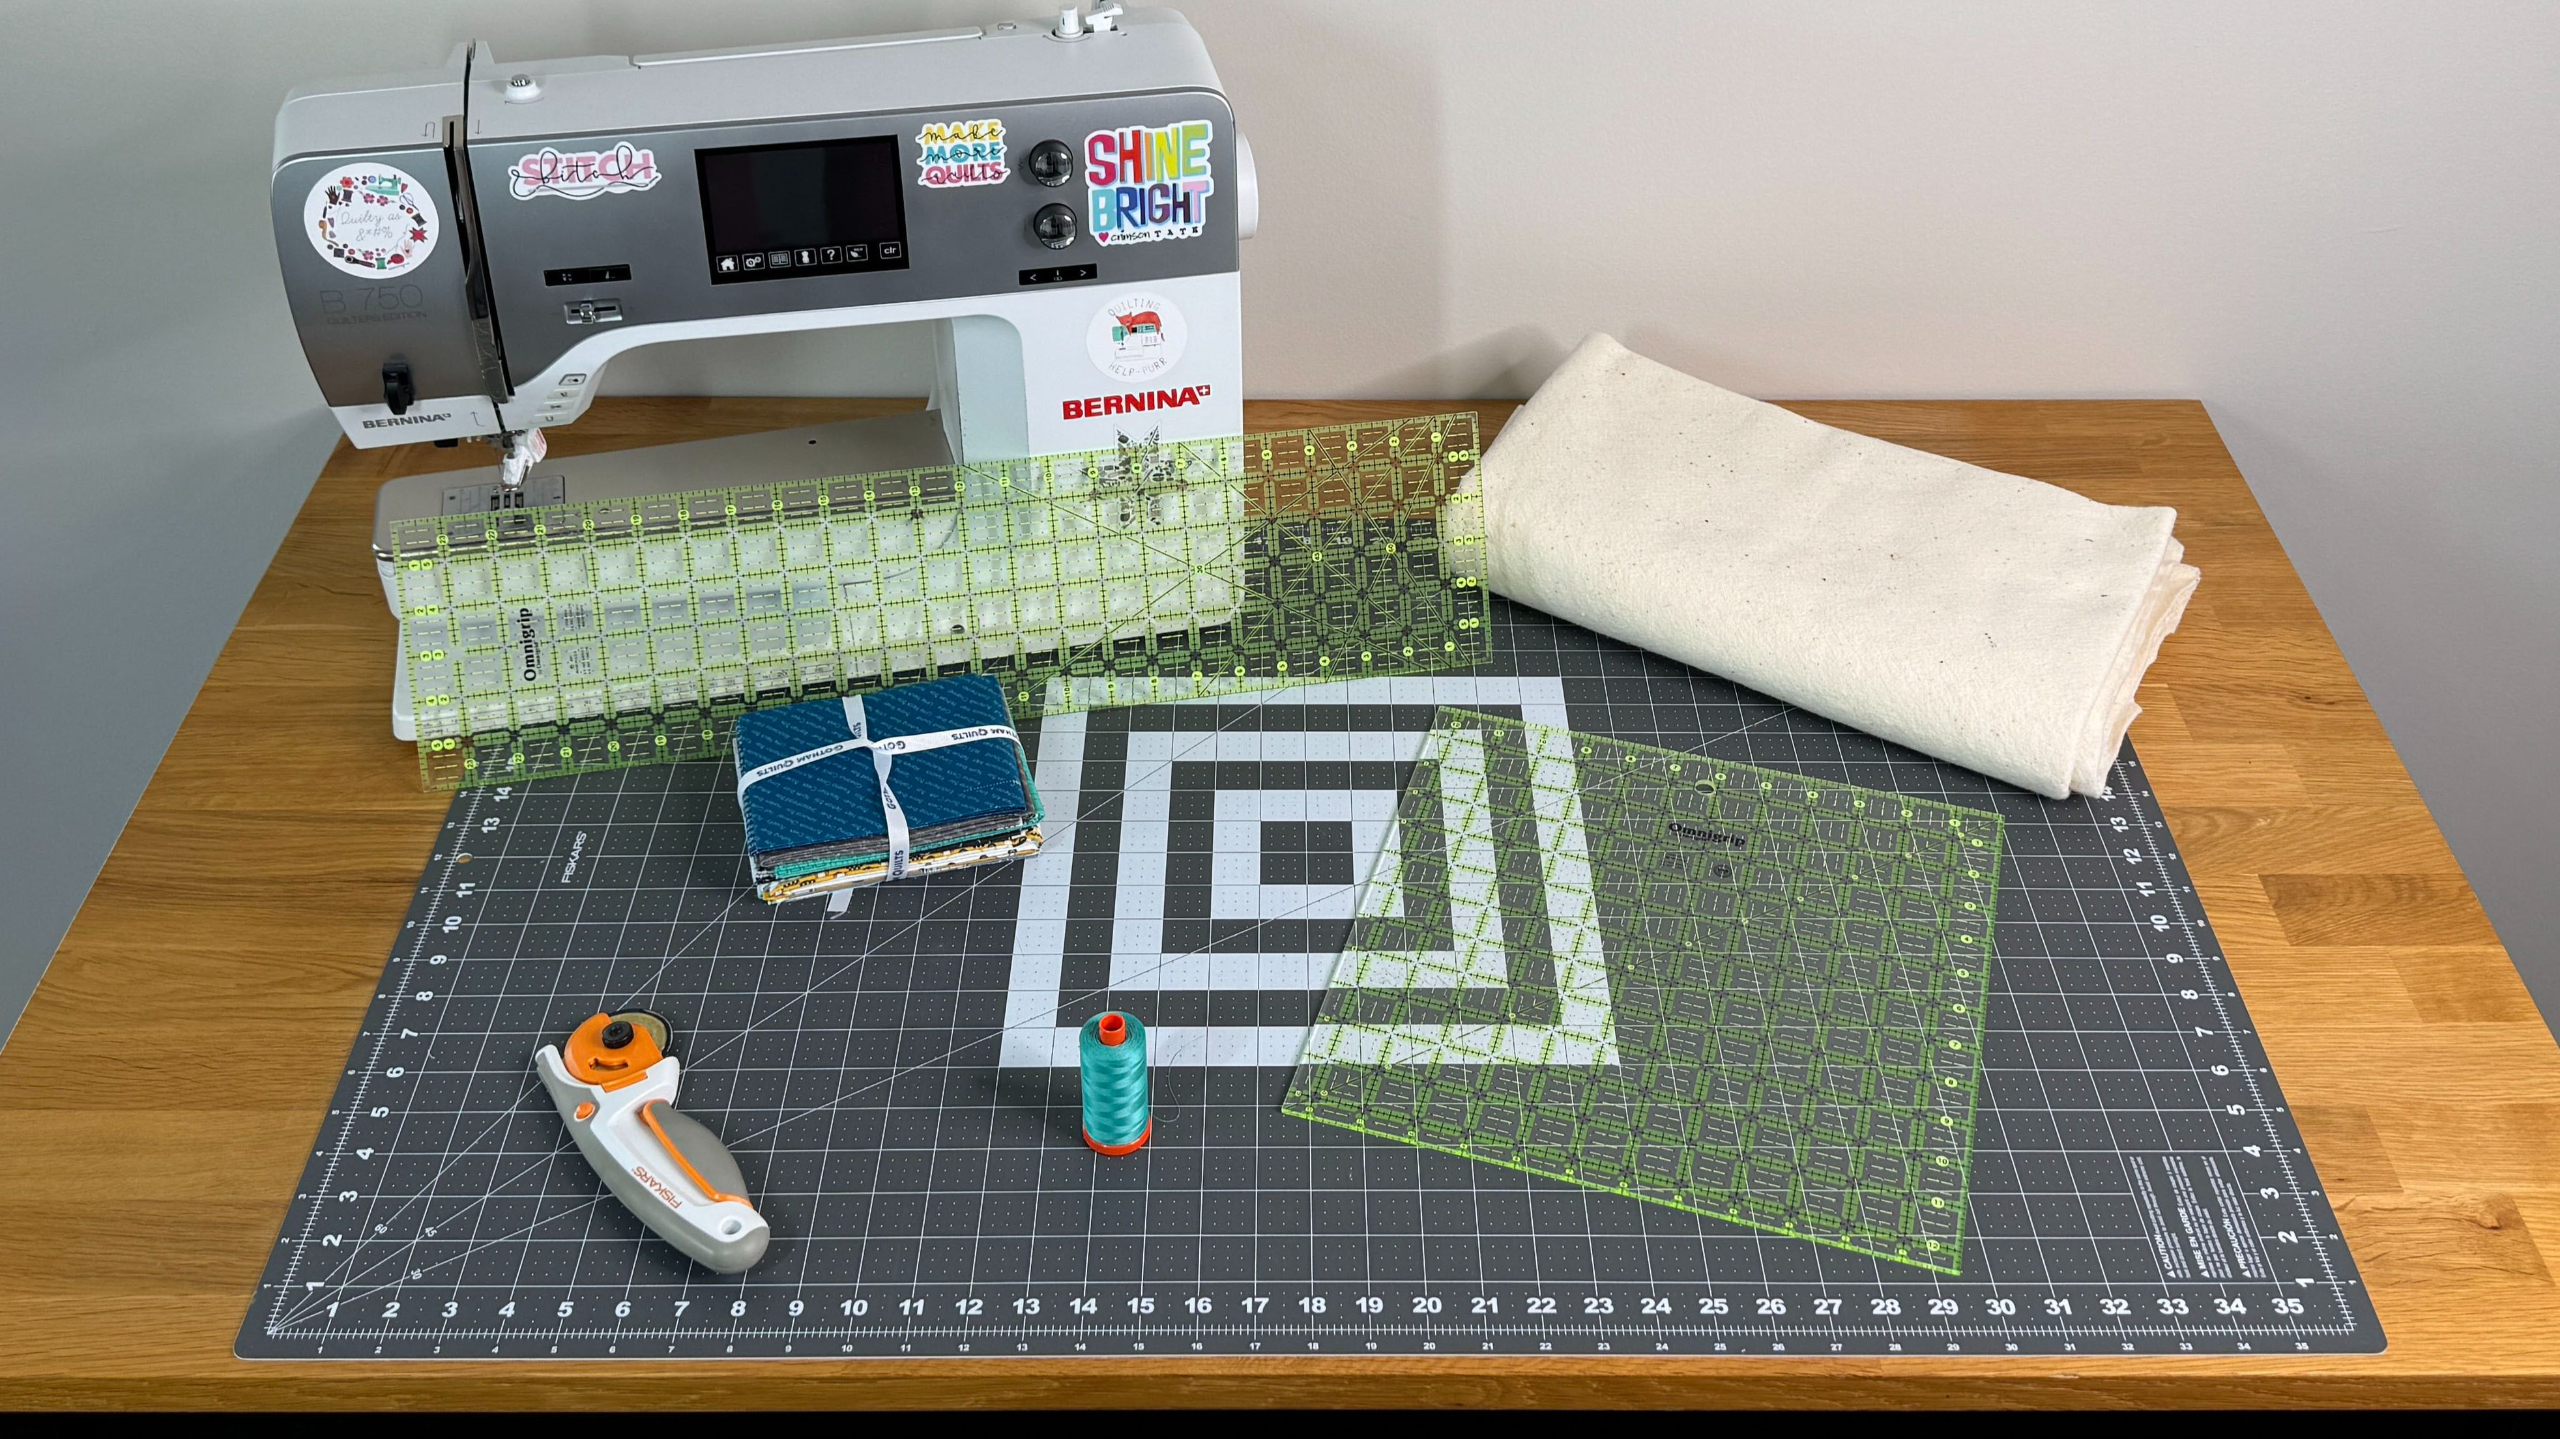
Seven things you need on day one.
Sewing Machine
A basic machine that lets you lower the feed dogs and attach a darning foot does the job beautifully. Your domestic sewing machine is enough. You don’t need to spend thousands, and you don’t need a longarm.
Fabric
The star of the show. Buy the best quality you can afford, and your quilts will last much longer. Buy only what you need for the project in front of you. A fabric stash can wait.
Batting
The cozy middle layer that makes a quilt a quilt. Packaged batting comes in standard quilt sizes, so buy what you’ll use for the project at hand. Save offcuts for smaller projects, and keep them organized so you actually use them.
Thread
Like fabric, buy the best you can afford. Start with 100% cotton thread for piecing and quilting. My go-to is Aurifil 50-weight in Dove Gray. I use it in every single project.
Rotary Cutter
The rotary cutter changed quilting. It looks like a pizza cutter and cuts faster and more accurately than any other tool. Try a few before you land on the one that fits your hand. My blog post on choosing a rotary cutter will help you decide.
Acrylic Rulers
These are how you’ll measure and cut. Start with one 8 ½" x 24" ruler and one 12 ½" x 12 ½" ruler. They’re the right size for learning to use a rotary cutter. You can add more later.
Self-Healing Cutting Mat
For the love of all that is holy, don’t be like me! My first cutting mat was actual cardboard. It was destroyed in one project. Buy the largest self-healing mat you have room for, and store it flat. Leaning it against the wall behind a cabinet leaves a permanent bend and a frustrating cutting experience.
Nice to Have
You probably already have these lying around the house. Use what you’ve got. The list is an iron, a marking tool, pins or clips, a seam ripper, and fabric scissors. Wait until you’ve pieced a few quilts to figure out the brands you actually like.
Skip for Now (or for Forever)
If a tool promises to do only one task well, you probably don’t need it, now or ever. Every block can be trimmed with the rulers above. Straight pins hold fabric as well as fancy clips. A No. 2 pencil marks the wrong side of your fabric just fine. The money you save on gimmicks is fabric for your next quilt.
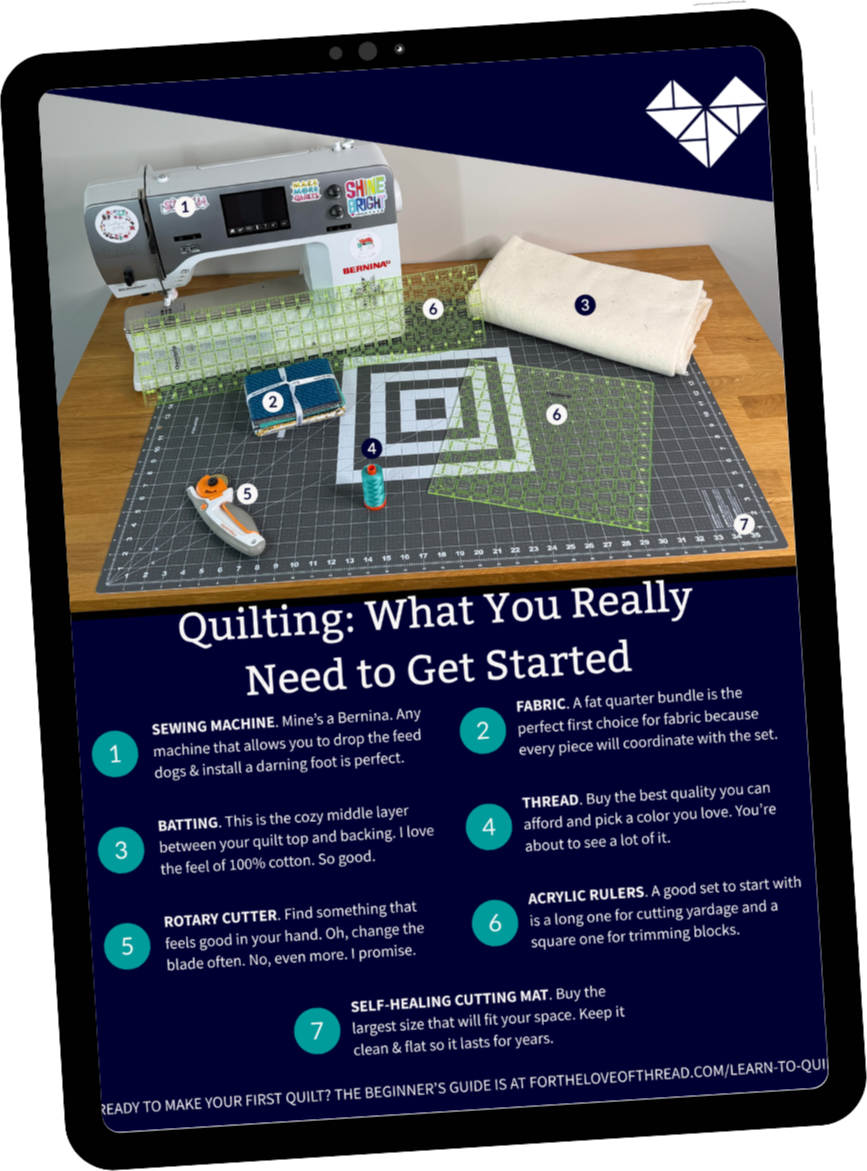
Take This List Shopping
I turned the seven essentials into a one-page printable you can take to the quilt shop. Print it, fold it into your wallet, and check things off as you fill your basket.
The Four Skills You Need to Make a Quilt Top
“I want to learn to quilt” can feel very intimidating when you start thinking about all there is to learn. It’s enough to make you second-guess yourself and put it off. Again.
Instead, let’s say, “These are the four skills I need to master to make a quilt top.” That sounds doable. Here they are.
Accurate Cutting
With all the seams in a quilt block, accurate cutting matters. Even a small inaccuracy will compound over a block, and your finished block won’t come out the size the pattern promised. Look for a rotary cutter that fits comfortably in your hand. Practice holding the ruler while you cut to make sure it doesn’t slide. Sliding will give you a crooked cut and could waste fabric, depending on how much the ruler slips. Press the ruler down firmly and let the cutter do the work.
Accurate Piecing
The quarter-inch seam is the heart of quilt piecing. Get it right, and your blocks will come out the size the pattern promised. Get it wrong, and you’ll wonder why nothing fits together. A special quarter-inch foot on your sewing machine helps a lot. So does sewing a test seam on scrap fabric and measuring it before you start a real block. Every machine has its own perfect position for that seam. Find yours once, take note of it, and you won’t have to guess again.
Pressing vs. Ironing
Ironing is what you do to remove wrinkles from your favorite outfit, so you look good. Pressing is what you do to make sure the seams in your quilt lie flat. The difference matters because bias edges, like the diagonal cuts in pieces like half-square triangles, will stretch and warp if you slide an iron across them. The fix is the lift-and-place method. Set the iron down, lift it, set it down again. No sliding. Your blocks stay the size you cut them, and your seams behave as expected.
Squaring Up Block Units
Many patterns will have you make certain units, like half-square triangles, slightly oversized so you can trim them down to the exact size. Skipping this step is the number one reason beginner blocks come out lopsided. The trick is to line up your ruler just right, depending on the block you’re trimming. That keeps your points sharp instead of getting clipped off. It’s the most tedious part of quilting, and the most worthwhile. Your favorite beverage and a podcast can make it feel like a breeze.
These four skills are all you need to make a quilt top you’re proud of. If you’re interested in a project that teaches them while making 10 different quilt blocks (and a gorgeous quilt top), check out the Skill Builder QAL. Each block focuses on a different technique and includes a step-by-step video that shows you what to do at each step.
The Four Quilt Blocks You Should Learn First
There are four quilt blocks, or block units, that recur in quilt patterns. They are worth mastering early, so future quilt patterns are less intimidating to make. These are half-square triangles, quarter-square triangles, flying geese, and square-in-a-square.
Half-Square Triangles
Half-square triangles, or HSTs, are two right triangles sewn together to make a square. They’re simple, versatile, and the single most useful unit in quilting. Once you learn to make them well, a whole world of larger blocks opens to you.
Quarter-Square Triangles
Quarter-square triangles, or QSTs, are four triangles sewn into a square. If you know how to make HSTs, you already know how to make QSTs. You sew two HSTs together to get the four triangles you need in this unit. These units are sometimes called hourglass blocks, and the placement of colors is where these blocks really come to life.
Flying Geese
Flying geese show up everywhere. You can find them in stars, and some patterns will place them in a continuous row to make borders and sashing in more modern designs. The design is a triangle surrounded by two smaller triangles, resembling a single bird in flight. You can make them using the stitch-and-flip method or by making four at a time. Both have tips to help your points turn out consistently, and I have a whole post on flying geese tips and tricks.
Square-in-a-Square
This block is a square, tipped on a 45-degree angle, situated inside another square. You can make these using either traditional or foundation paper piecing. Once you learn to recognize it, you’ll start seeing it in patterns everywhere. And when you learn to make it accurately, you’ll know how to piece some of the prettiest blocks out there.
Choosing Your First Quilt Project
How do you pick a first quilt project that’s worth finishing? You want it to be beautiful and to actually finish it. Choosing something too difficult can lead to frustration. And a frustrated quilter is more likely to put the project in a closet than finish it.
One way to know you’re choosing a great project is to check the skill level listed on the quilt pattern. Every pattern has a skill level: beginner, confident beginner, intermediate, or advanced.
Just because this will be your first quilt doesn’t mean you need to limit yourself to beginner-only patterns. There are several confident beginner patterns that could be perfect for you. Regardless of skill level, look for plenty of diagrams, clear instructions, and photos of finished quilts so you can see what it looks like when it’s finished.
When deciding on the size of your first quilt, I highly recommend a throw-sized quilt for a couple of reasons. First, it’s big enough to practice your piecing technique without being overwhelming. Next, it’s not so big that you can’t handle the top when you’re near the end of piecing it together or quilting it. Finally, it’s just the right size to snuggle under on your couch while you’re watching your favorite show. And admiring your work, of course.
And keep the fabric simple for your first quilt. A handful of colors you love is plenty. Your second quilt can be more ambitious.
Sometimes new quilters get so excited about making quilts that they want to make and give away nearly every one. Starting with a throw quilt will make you less likely to give away your hard work. You can always make baby quilts later, and they’ll seem like a breeze once you have a larger quilt under your belt… er, needle.
The Mindset Thing Nobody Talks About
Here’s something that doesn’t show up on any supply list. The biggest barrier to finishing your first quilt is rarely your sewing machine, your fabric choice, or your seam allowance. It’s the voice in your head that says it has to be perfect.
That voice is wrong. And it will quietly cost you more first quilts than any crooked seam ever has.
Every quilter I know has a first quilt story. The points don’t quite line up. The corners aren’t quite square. The fabric pull was a little ambitious. And almost every one of them, no matter how many quilts they’ve made since, still loves that first quilt. Or keeps it folded somewhere they can’t bring themselves to give away. Or talks about it with the same warmth you’d use for a dog you grew up with.
That’s not because the first quilt was perfect. It’s because the first quilt was finished.
My first quilt started as a stack of ugly calico squares in Ziploc bags. Those bags sat for three years before Susan walked me through every step, from the quarter-inch seam to the binding. The finished quilt was not beautiful. It was just finished, and that turned out to be the only part that mattered.
So, here’s the permission you didn’t know you were waiting for. Your first quilt is allowed to be wonky. It’s allowed to have a corner that doesn’t quite square up. It’s allowed to be made of fabrics you’d choose differently next time. None of that is failure. All of that is learning, and learning is the whole point.
A successful first quilt isn’t beautiful. It’s two things, in this order. First, it taught you something. Second, you finished it.
If you can do those two things, the next quilt will be better. And the one after that. After a few quilts, you’ll find yourself in the strange, wonderful position of being the quilter who tells someone else not to worry about being perfect.
Your first quilt isn’t supposed to be your best quilt. It’s supposed to be your first.
Your First Quilt, Start to Finish
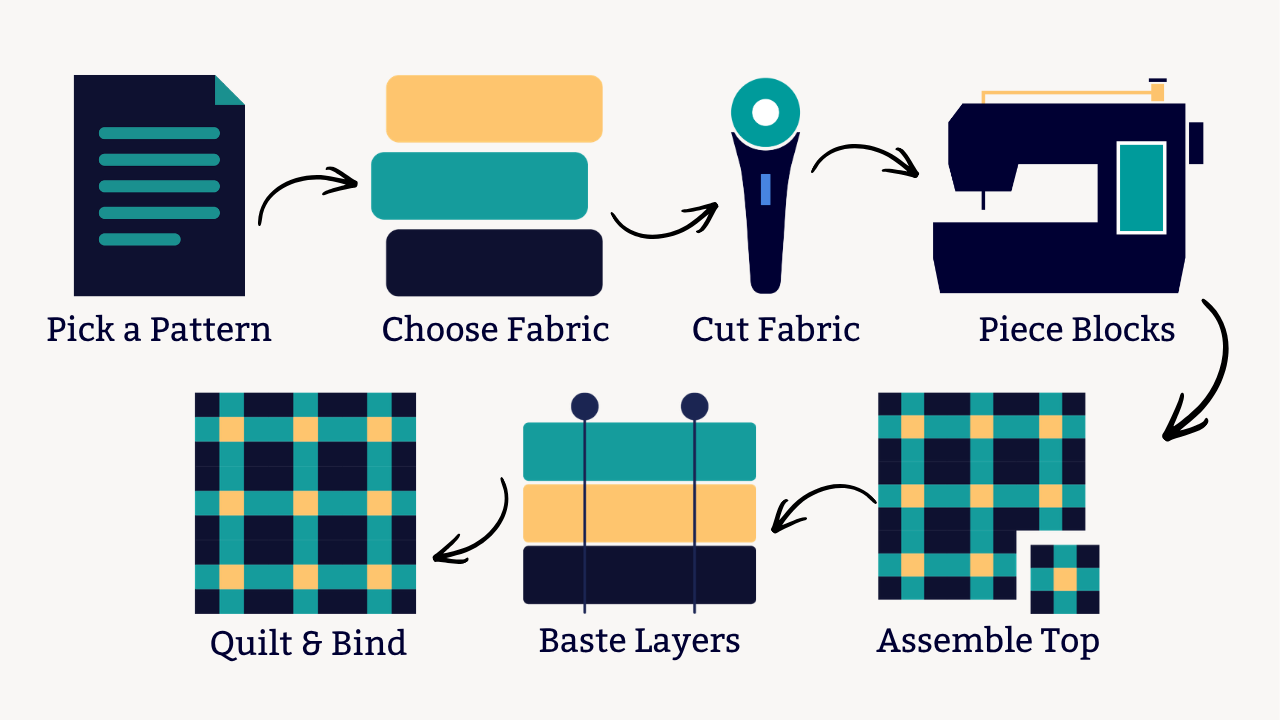
Some quilt patterns assume you already know the order to do everything in. If this is your first quilt, that order isn’t obvious yet. Here are the seven steps.
- Pick a pattern. Remember, you don’t need to stick to patterns labeled “Beginner.” Patterns for confident beginners still include plenty of process diagrams and clear instructions to walk you through everything.
- Choose your fabric. Use the fabric requirements chart in your pattern to determine how much fabric you need for your quilt. If you’re unsure about color, my Color 101 blog post covers the basics. Some patterns also include images of multiple colorways to help with this step.
- Cut your fabric. Cutting can be tedious, but doing it right makes all the difference when you’re piecing later. I like to do all my cutting in one session, so I have everything ready when it’s time to start piecing.
- Piece your quilt blocks. It’s a good idea to read the entire quilt pattern before you get started. This will help you know what to expect and answer any questions you might have about why you’re doing things a certain way.
- Assemble the quilt top. This is where you start to piece your blocks into rows and columns, and you begin to see your quilt come to life. Enjoy this step. I love counting down the seams to a finished top, and it’s so exciting when that last stitch falls into place.
- Baste your top, batting, and backing. This is another tedious step, but doing it right makes the quilting process much easier. Watch a time-lapse video of me basting a quilt at the link.
- Quilt and bind it. This is my absolute favorite step, and it’s why I teach quilting. I believe any quilter can quilt any quilt on any sewing machine. Yes, even your first quilt. Yes, even on your machine. My FMQ 101 class walks you through everything from setting up your machine to your first stitches on a real quilt. The best part? It’s free.
Common Beginner Mistakes (And How to Avoid Them)
You can be like me and start cutting ugly fabric on a cardboard cutting mat. Or… you could look at these common mistakes beginner quilters make, learn from them, and start out way ahead of me. Let’s go with Option B.
Not Finding “Your” Quarter-Inch Seam
Pair (2) 2" squares and sew them with a quarter-inch seam. Press the seam and measure the unit. If it measures 3 ½", you’re golden. Note how you sewed that seam and repeat the process each time. If it doesn’t, keep making small adjustments until you find the right quarter-inch seam for you.
Do this every time you sit at a new machine, since presser feet vary.
Not Making a Test Block
When you start your first pattern, if you can cut just enough fabric for a test block, take advantage and make one. A test block lets you refine your quarter-inch seam and practice pressing. It also confirms you understand the piecing instructions and that your block comes out to the right size.
Using “Meh” Fabric
Your quilt is going to last a long time. Instead of using fabric you don’t love, let’s go all out on the good stuff. Buy the best fabric you can afford in colors and patterns you love. Then use it. Don’t let it sit on the shelf because it’s “too nice” to use yet.
Choosing a Too Ambitious Pattern
Don’t choose something labeled Advanced for your first quilt. That’s a quilt or pile of fabric that goes back into the closet. We’re here to finish quilts, not burn out.
Cutting First, Measuring Later
I see too many posts on social media from quilters who made a cutting mistake and are now out of fabric. They’re reduced to begging to see if anyone has a few inches in their stash to sell or trade. Measure twice. Cut once.
Ironing Instead of Pressing
Sliding your iron across your seams can distort them and put your block out of shape. This is especially true if you’re using a steam iron. Press instead. This is how you get your seams to lie flat without stretching.
Thinking You’ll “Quilt it Out”
You won’t. It’s easy to see a wonky seam in your quilt top and think you can smoosh it down later during the quilting step. I have enough years of experience with this problem to assure you that it never works. Take your time when piecing to make sure you have a nice, flat quilt top to quilt later.
Comparing Your Beginning to Someone Else’s Middle
You’re working on your first quilt. You’re going to make mistakes, and that’s OK. We’ve all been there. We love these little wonky goblin quilts with all our hearts. We got better with each new quilt we finished. Compare your first quilt to my first quilt, not my 500th. (Do that, and I promise you’ll win.)
Where to Go From Here
You’ve made it to the end of the page. By now, you know what supplies you need, the skills to build first, and the blocks worth learning. You know the steps for making a quilt from start to finish, and the common mistakes to dodge along the way. Here’s where to go from here, in the order that makes sense for where you are right now. Pick the next step that works for you, and remember that each one makes the next one easier.
Get the Beginner Quilter’s Supply List
For the quilter who wants to start but doesn’t trust the supply lists she’s seen online. A one-page PDF of the actual essentials, plus my best tips for new quilters, sent straight to your email.
Make Your First Quilt: The Holland Pattern
For the quilter who has her supplies and is ready to pick a project. Holland is an entire quilt of flying geese using the no-waste, four-at-a-time method. The repetition is the gift. You’ll learn one technique deeply instead of bouncing between a half dozen blocks.
Holland was also the first pattern I ever published. My first pattern gets to be your first pattern.
Join the Skill Builder Quilt Along
For the quilter who wants structure, weekly video tutorials, and company while she makes her first quilt. Ten different blocks, a finished throw-sized quilt, and every foundational skill you’ll need for every quilt that comes after.
Browse My Quilt Pattern Library
For the quilter who finished her first quilt and is ready for her next one. A growing library of plain-language patterns at every skill level, so you can keep picking projects that match where you are now.
When you finish a few quilt tops, you might want to learn to quilt them yourself on your own machine. The free motion quilting world is waiting for you. No rush. The piecing comes first.
Whatever step you take next, I’m rooting for you. Susan pulled up a chair next to me decades ago and showed me what came after the squares. Consider this chair pulled up next to you. The next quilt is closer than you think.
Frequently Asked Questions
Every new quilter shows up with roughly the same questions. Here they are, with the answers I'd give you at my kitchen table.
What is Quilting?
How Long Does it Take to Make a Quilt?
Do I Need a Special Sewing Machine to Quilt?
How Much Does it Cost to Start Quilting?
Can I Learn to Quilt by Myself?
Do I Need to Know How to Sew to Start Quilting?
What's the Easiest First Quilt to Make?
Should My First Quilt be a Baby Quilt?
Do I Need to Prewash My Fabric?
A Final Word
Any quilter can quilt any quilt on any sewing machine. That belief is the foundation of everything I do, and it’s just as true for you.
You made it to the end of a very long page. That tells me you’re more than curious about quilting. You’re ready to start.
Make your first quilt with company. Join the Skill Builder QAL.