Have you ever finished a block, held it up, and noticed it’s a little wonky or a touch too small? The first thing most quilters check is their cutting and their quarter-inch seam. Both are worth looking at. But honestly? Most of the time, the trouble isn’t there. It’s at the iron.
The good news is that this is one of the easiest fixes in quilting. You just need to know the difference between ironing and pressing.
Ironing vs. pressing

Ironing is what you do to a wrinkled shirt. You slide the iron back and forth, working the wrinkles out. The fabric moves under the iron as you go.
Pressing is different. You lift the iron straight up and down on one spot of your project, usually a seam, to give it a crisp finish. The fabric stays still. No sliding, no scrubbing.
That tiny change in motion is the whole secret. Sliding the iron on freshly sewn pieces stretches the fabric, especially along bias edges, and that’s how blocks come out wonky or shrink down when you weren’t looking.
Why this matters more than you think
Quilt blocks are built from a stack of tiny accuracies. A perfect quarter-inch seam, an accurate cut, and a careful press all add up to a block that finishes the size it’s supposed to be. Skip the careful press, and the rest of your good work has to fight for it.
When you slide the iron over a 2 ½” inch unit, you can easily stretch it by an eighth of an inch. Multiply that across a block, and you’ve got a piece that won’t match its neighbor. Press it properly, and the unit stays the size you cut it.
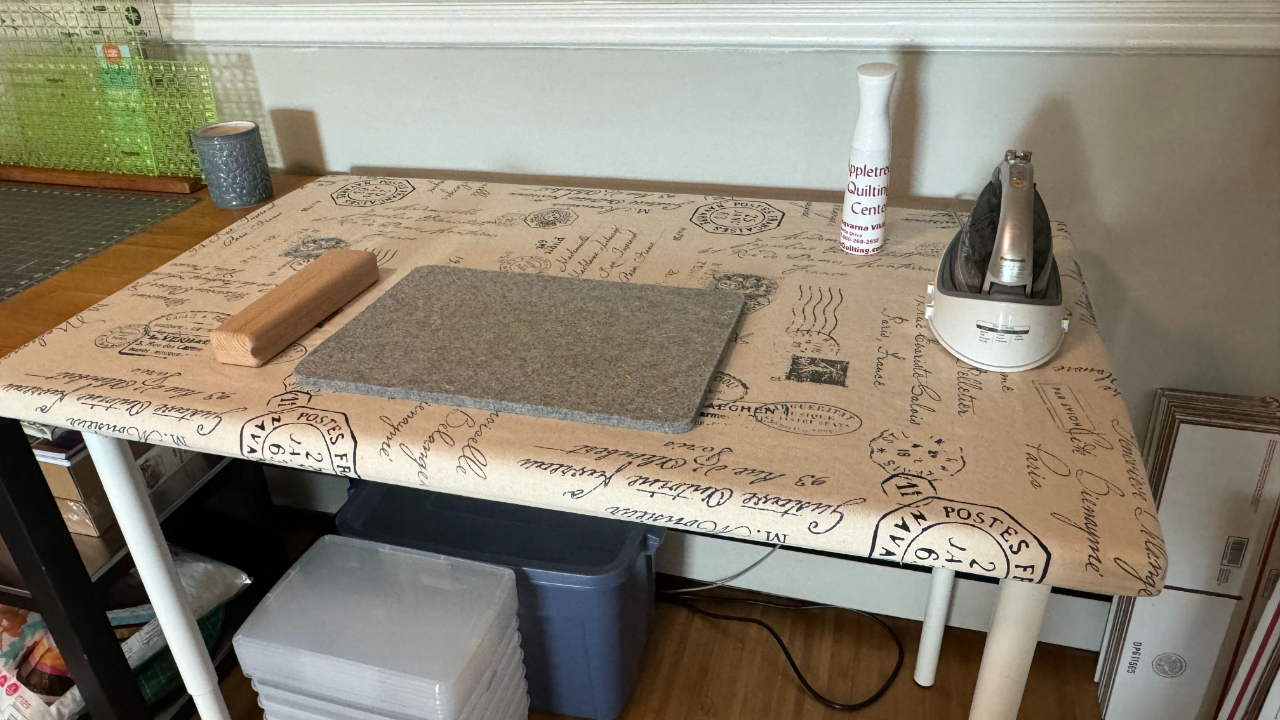
The tools that make pressing easier
A sturdy ironing board is your foundation. If you’re turning a tabletop into a pressing station, use a heat-resistant cover so you don’t scorch the surface underneath.

I love my cordless Panasonic iron. Even on its highest setting, it doesn’t scorch or stretch my fabric, and not having a cord to wrangle is a small joy every single time.
A wool pressing mat is the upgrade that surprised me most. It holds heat from both sides, which gives your seams a little extra crispness, and it saved me from buying ironing board covers on what felt like a recurring subscription.

A tailor’s clapper is a block of hardwood you set on top of a seam right after you press it. It traps the heat in the fabric as it cools, which flattens bulky or stubborn seams in a way nothing else does. Once you try one, it’s hard to go back.
How to actually press
Let the iron do the work. You don’t need to lean on it. The weight and the heat are enough.
Set the seam first. Press the seam closed, right where it came off the machine, before you open it. This sinks the thread into the fabric and helps everything lay flatter when you open it up.
Press with the grain when you can. Bias edges are stretchy. If you press across them, they’ll grow on you.
Never press over pins. They’ll scratch your iron plate and leave marks on your fabric.
Press each seam before crossing it with another. Crossing a wrinkled or unset seam with a new one is how you end up with a lumpy intersection that won’t lie flat.
Which way to press your seams
There are two camps here. Pressing to one side is the traditional approach. It’s strong, fast, and makes seams easy to nest. The usual rule is press toward the darker fabric so the seam allowances don’t shadow through the lighter one.
Pressing open distributes bulk more evenly, which can be great for blocks with lots of seams meeting in one spot. The trade-off is that open seams are a touch weaker and don’t nest as nicely.
Most of the time I press to the side. I save pressing open for blocks where the seam allowances are piling up so much that one side would create a bump.
Nesting your seams
Here’s the payoff for pressing to the side. When two rows meet, press their seams in opposite directions. Where they line up, the two seam allowances will tuck against each other like puzzle pieces. You can actually feel them click into place. That little click is a perfectly matched intersection waiting to happen.
If you’re piecing a quilt with a lot of matching points, planning your pressing direction is just as important as your sewing.
Common pressing mistakes
Sliding the iron. Old habit from clothes. Lift, don’t slide.
Pressing before setting the seam. Opening the seam too fast can shift the threads and the fabric. Set it first, then open it.
Cranking the steam without testing. Steam can distort fabric if you’re heavy-handed. If you like steam, keep a small spray bottle nearby and use it like a tool, not a faucet.
Not pressing as you go. Saving up a whole stack of blocks to press at the end is a recipe for stretched and warped pieces. Press as you build.
Try it on your next block
Sew a unit, lift the iron, set it down, lift it up, move on. That’s it. It feels slower at first, but it’s actually faster because you’re not redoing work or squaring up wonky blocks at the end. Give it a few blocks and you’ll feel the difference. Your blocks will land at the size you cut them and your intersections will start to nest like they were meant to.
Good luck and happy pressing!
This post includes affiliate links. While you pay nothing extra, I earn a small commission to add to the fabric budget!