If you can draw it, you can quilt it.
I took these words to heart years ago, and they completely changed how I approach free motion quilting. They take all the pressure off your sewing machine and put it back where it belongs, on building skills you can grow.
The path to better FMQ doesn’t start with thread. It starts with a pen.
What doodling is and why it works
Those little stars and flowers in the corners of your notebook? Those are doodles. For free motion quilting, doodling means intentionally drawing your quilting designs on paper before you ever touch your machine. You’re practicing the path your hand will travel when you’re quilting.
Here’s why it works. Free motion quilting is hand-eye coordination on a moving target. Your hands guide the quilt under a stationary needle, and your brain must plan the path while your hands execute it. That’s a lot to ask the first time you try a new design at the machine.
Doodling lets you build the brain-and-hand connection in low-stakes mode. No needle, no bobbin tension, no fear of ruining a quilt top you spent weeks piecing. Just you, a pen, and the page.
And it’s the most affordable part of the entire hobby. The cheapest scrap of paper and the nearest pen will get you started. That makes it portable, too. You can doodle in a waiting room, on the couch, or in the car when you’re not the one driving.
When doodling pays off most
You can doodle any time, but here are the moments where it earns its keep.
When you’re learning a new design. Before you sit down at the machine, doodle the new design until your hand knows the path. The muscle memory you build on paper transfers straight to the machine. You’ll save yourself a lot of unpicking.
When you haven’t quilted a design in a while. I keep a doodle book right next to my machine. Before I start quilting, I’ll doodle the design I’m about to use for a few minutes to get back into the groove. It’s a warm-up, same as a runner stretches before a race.
When you’re planning a quilt. This is where doodling shifts from skill-building to design-building. If your quilt pattern comes with a coloring page, doodle quilting designs into different sections until you find a plan you love. No coloring page? Snap a photo of your quilt top and either sketch on a tablet or print the picture and doodle right on top.

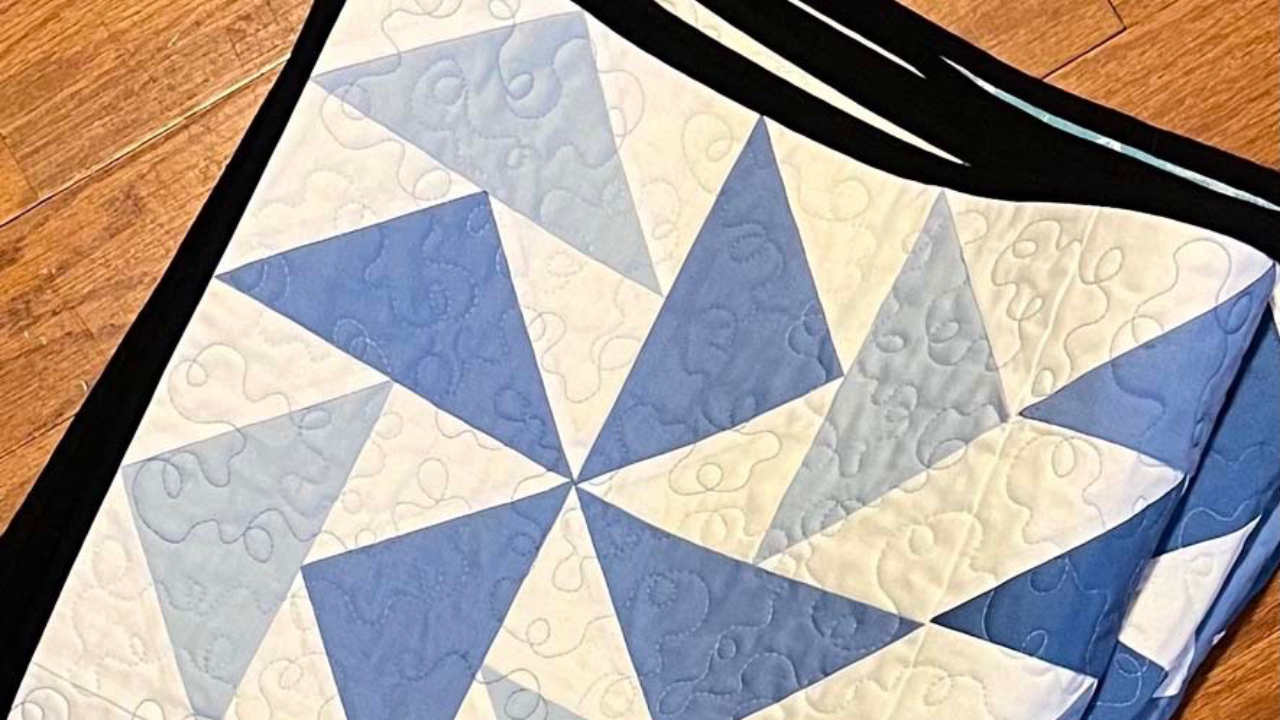
I do this for every quilt I make. The coloring page for my Sawtooth Splendor pattern is a great example. I doodled three or four different quilting plans on copies of the coloring page before I landed on the one I quilted. It saved me from committing to a plan I wouldn’t have loved.
When you’re nervous. This is the one nobody talks about. If you sit down at the machine feeling tense, your shoulders lock up, and your quilting follows. A short doodle session loosens you up and reminds you that you know how to do this. Confidence is a real tool, and doodling builds it.
Tools for doodling
The honest answer is that any pen and any paper will get the job done. That said, a few small upgrades make doodling more enjoyable, and the more you enjoy it, the more you’ll do it.

A journal you want to open. I’m a journal addict, so this part is easy for me. Pick one with a cover you like. You’ll reach for it more often.
Lines, dots, or grids on the page. This is the practical upgrade. Lined, dotted, or grid pages give you built-in guides for spacing and sizing. When you’re working on a design that needs to be a consistent size across a quilt, those little dots are pure gold.
A pen or marker that brings you joy. I almost always grab whichever pen feels good in my hand that day. Doodling should feel like a treat, not a chore.
A tablet with a drawing app. Optional, but useful for planning. You can drop in a photo of your quilt top and doodle quilting plans right on top of it. Bonus: You can save and compare different versions side by side.
That’s it. You don’t need a fancy setup to make real progress.
My best doodling tips
These are the four habits that have made the biggest difference for my students and for me.
Keep your drawing hand off the page. This is the single most important tip. At your sewing machine, your hand glides above the quilt as you move it under the needle. If you anchor your hand on the paper while doodling, you’re practicing something different from what you’ll do at the machine. Hold your hand just above the page, the way you hold it above the quilt. Your first doodles will look wobbly and weird. That’s perfect. Your actual quilting will almost always look better than your doodles because the machine gives you more control.
Stick with one design at a time. Resist the urge to bounce around. Pick one design and dedicate a few pages in your journal to it. The longer you stay with a single design, the deeper the muscle memory goes. Switching every few seconds keeps you in beginner mode forever.

Fill the whole page. Don’t stop in the middle of the page when you get bored. Push through to the edges. This teaches you what to do when you run out of space, hit a corner, or need to travel to a new spot. Those problem-solving moments happen on every quilt, and the page is the safest place to learn them.
Start in a different spot every time. Start one page in the top left; the next, start in the middle. Then start in the bottom right. You’ll quickly learn which directions feel natural to you and which feel awkward, and that tells you something about how to move your quilt sandwich under the needle.
A simple doodling routine
If you want a little structure to follow, try this for one design.
Page one, doodle slowly and pay attention to the shape. Page two, doodle a little faster and aim for an even size. Page three, start in a corner and try to fill the whole page without lifting your pen. Page four, start in the middle and work outward. By the end of those four pages, you’ll know that design in your hand. When you take it to your machine, your body will already know what to do.
This is exactly the path I walk students through in my free motion quilting classes. Each class teaches four to six FMQ designs using my three-step method. Doodle the design to build muscle memory, practice it on a small quilt sandwich, then quilt it into a real project. Doodling is step one for a reason. The students who lean into it are the ones who feel confident the fastest.
Try the meander
If you’re not sure where to start, start with a meander. It’s a simple, wandering line that loops gently without ever crossing itself. It’s the design most quilters learn first, and it’s a great warm-up no matter how long you’ve been quilting.

Grab a pen, grab some paper, lift your hand off the page, and start drawing curvy paths that fill the space. Don’t worry about how it looks. You’re not making art, you’re building skill.
I’d love to see what you come up with. Doodling is the cheapest, easiest, most portable way to grow as a quilter, and I can’t recommend it enough.
Want to go deeper? I offer a free course to get you set up for free motion quilting success in an afternoon. Sign up for FMQ 101 today.