Have you ever looked at a quilt with impossibly sharp points, intricate geometric designs, or tiny, precise pieces and wondered how on earth someone made that? Chances are, the answer is foundation paper piecing.
Foundation paper piecing, or FPP, is a quilting method in which you sew fabric directly onto a printed paper pattern. The paper serves as a guide, providing stitch lines to follow and a stable foundation to sew on. The result is a level of accuracy that’s very difficult to achieve with traditional piecing alone.
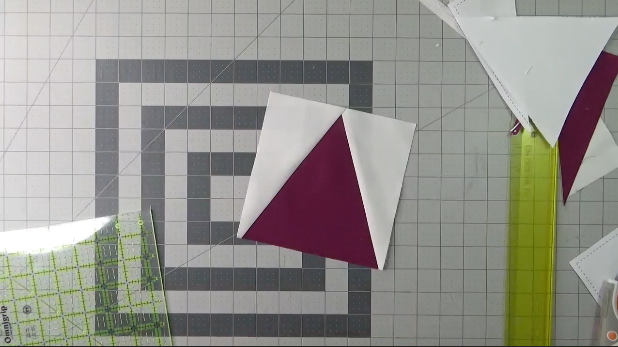
In Week 9 of the Skill Builder Quilt Along, we’re trying FPP for the first time using a simple triangle-in-a-square block — just three pieces and two seams. The goal isn’t to tackle a complicated design right away. It’s to get a feel for how the technique works, so it doesn’t feel mysterious the next time you encounter it in a pattern.
Let’s take a closer look at what makes foundation paper piecing such a valuable skill to know.
What Is Foundation Paper Piecing?
In traditional quilting, you cut your fabric pieces to size and sew them together, relying on accurate cutting and consistent seam allowances to make everything fit. Foundation paper piecing flips that process on its head.
Instead of cutting precise pieces first, you start with a printed paper pattern that shows the finished shape of your block, divided into numbered sections. You place your fabric on the back of the paper and sew directly on the printed lines from the front. Each seam is guided by the line on the paper, which means your accuracy comes from the pattern itself rather than from your cutting or measuring.
The paper is removed after the block is complete, and what you’re left with is a beautifully precise block that would have been very difficult to make any other way.
Where Does Foundation Paper Piecing Show Up in Quilting?
FPP is the technique behind some of the most stunning and intricate quilts you’ll ever see. If a block has lots of tiny pieces, very sharp points, or complex angles, there’s a good chance it was made using foundation paper piecing.
You’ll find it in:
- Mariner’s Compass blocks, with their many sharp, narrow points radiating from the center
- Paper-pieced star blocks, from simple eight-pointed stars to elaborate kaleidoscope designs
- Modern geometric quilts with precise angles and bold graphic shapes
- Art quilts and pictorial quilts, where FPP is used to create realistic images from fabric
- Classic blocks like Pineapple and New York Beauty, which rely on FPP for their intricate construction
FPP has also become hugely popular in the modern quilting movement, where designers use it to create everything from simple geometric shapes to incredibly detailed portrait quilts. Once you understand the technique, you’ll start spotting it in patterns you’ve admired for years.
Why Foundation Paper Piecing Is Worth Learning
The most obvious reason to learn FPP is the designs it makes possible. There are entire categories of quilt blocks that are genuinely difficult, sometimes nearly impossible, to construct accurately without a paper foundation. If you’ve ever shied away from a pattern because the pieces looked too small or the points too sharp, FPP is the technique that changes that.
It’s also one of those techniques that feels a little intimidating from the outside but becomes much more approachable once you try it. Most quilters who learn FPP are surprised by how logical it is once they work through their first block. And that first block, even if it’s simple, is often all it takes to make the technique click.
Tips for a Stress-Free FPP Block
Foundation paper piecing has its own rhythm, and a few good habits from the start will make the whole experience smoother.
Use a shorter stitch length. A shorter stitch length perforates the paper more thoroughly, making it easier to tear away cleanly at the end. It’s one of the simplest adjustments you can make and one of the most helpful.
Start and end your stitching at least a quarter inch past the seam lines. This creates your seam allowance at each end of the seam and keeps your stitching secure. Don’t start right on the line; go a little beyond it on both ends.
Use a dab of glue stick to anchor your first piece. Positioning piece 1 on the back of the paper and keeping it in place while you carry everything to your machine is one of the trickier parts of FPP for beginners. A tiny dot of washable glue stick holds it right where you put it without any fuss.
Choose your paper thoughtfully. Regular printer paper works fine, but unbleached paper is worth considering, especially if your seams are very small and you’re worried about getting out every scrap of paper. FPP specialty paper is available, but it isn’t necessary. Avoid thin papers like newsprint on your first try. You’re likely handling the paper a little more on your first blocks, and they can tear too easily before you’ve finished the block.
Know that your block may be a mirror image. Because you’re sewing from the printed side of the paper while the fabric sits on the back, FPP blocks are often the reverse of the printed pattern. Don’t worry if you see the finished block in your pattern facing one way only to find the paper pattern facing the other way.
Want to Try Foundation Paper Piecing with Guidance?
FPP is the kind of technique that’s so much less intimidating when you have a simple project to practice on and someone walking you through each step. That’s exactly what we’re doing in Week 9 of the Skill Builder Quilt Along.
Throughout the quilt along, we’ve been building skills one block at a time, from strip piecing to half-square triangles, flying geese, quarter-square triangles, half-rectangle triangles, and square-in-a-square. Foundation paper piecing is the next piece of the puzzle, and we’ve kept this week’s block intentionally simple so you can focus on learning the technique without getting overwhelmed by a complicated design.
If you’ve been on the fence about joining, now is a great time. We’re in the final stretch, but you can still join us to sew along, finish your quilt top, and access some great bonuses for finishing your project.
You can find all the details on the Skill Builder QAL home page. We’d love to have you with us for the finish.